 Work-holding system.
Please also see: Ring Clamp Conversion
Click on images to enlarge them.
I have a short video on this system.
On this page, I’ll show you how to make a bench pin holding system, that is similar to the more expensive (yet, fabulous) GRS work-holding system. I own a GRS work-holding system, the GRS BenchMate Inside-Ring Holder, their Bench Pin and a few other goodies. I love this system – there are tons of addons and it works beautifully. But, if you don’t have the cash, don’t have the room or like DIY studio projects, this project is a great option for you.
You can use this clamping system for stone setting, finishing, drilling: for whatever clamping needs you have. 
Tools
- C-Clamps (if you want).
- Drill
- Drill Bit
- Ruler
- Saw (maybe)
Materials

- Nuts or wing nuts to attach “U” bolt.
- O-Rings: Round. I used: 1-1/2 Inch I.D. x 1-7/8 Inch O.D. x 3/16 Inch Thick. O-ring. I found mine at my local True Value Hardware. The O-Ring Store carries them too.
- I
 O-Ring. If you can’t find them, my buddy Fred, who owns a few of my local True Value Hardware, would be glad to ship them to you. Ask for Fred and tell him that I sent you. He’ll be happy to hear from you! You can also find them at Amazon.
  Flat Washer. Dimensions I used: 1.50″ ID, 2- 3/8″ (or 2 1/4″) OD, 1/8″ thick. Check with Fred at True Value or order via Amazon.
- Scrap wood
- Screws
- “U” Bolt – mine is about: 5/16″ X 2-3/8″ (W) X 3-5/8″ (L). Thread length: 1-1/2″. 1-3/4″ inside width. Inside height approx. 3″. The width of the metal doesn’t matter as much as the interior space and leg length.


Instructions
- Size wood to make frame. You can use any scrap wood but, I used a 1″ x 2″ for the bench side and a 1″ X 4.5″ for the clamp side. Make the bench side longer, if you are clamping this to your workbench (I didn’t think of this until later). This allows you easier access to your clamps for moving the device. If you are drilling the board to the bench, you can skip the bench-side board entirely or you can screw it into the bench top using the frame described.

- The clamp-side board, can be as long as you want. Don’t forget to take into consideration any drawers or cabinets that it may block – especially if you are mounting it, with screws or bolts, to your bench. A 4″ long piece for the clamp board and 6″ long piece for the bench board, should be sufficiently wide to mount your clamping system. Make the whole frame wider if you want to mount a few clamps.
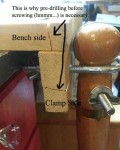 Drill starter holes where you will be attaching the two boards. Use a drill bit, slightly smaller than your screw, to make the starter holes. If you are screwing the frame to your bench, drill starter holes at the attachment points. (I didn’t do this and my wood cracked – as illustrated above!)
- Screw, in several places, the two pieces together as shown in the photo. (I’d put at least one more screw in, than I did!)

- Decide where to place the U bolt. You’ll want to place it where you will be able to work comfortably. You could also drill a few sets of holes and make the clamp position adjustable.
- Put the U bolt where you want it and trace around one leg.
- Drill first hole in the center of your mark.
- Place one leg of U bolt above the hole, that you just drilled, and trace the other leg position on the wood. Don’t insert the leg of the U bolt into the first hole as it will not be level and your next hole will be off.
- Drill second hole. Check fit.
 The U bolt might fit tightly. If you want to remove it often, either use a slightly larger bit or a file to open the hole a tad. You don’t want the bolt flopping around. You can also leave it as is, with a tight fit. Just tap it into the holes with a mallet so, that enough sticks out to screw on the nuts. But wait a second before you whack the U bolt in. Read on…
- Slide the flat O-ring down the ring clamp’s body until it fits snugly. It should be a bit above the clamp’s hinge.
 Now, slide the round O-ring onto the flat O-ring. The round O-ring will probably be tighter than the flat – that’s what we want. The O-rings will hold the ring clamp in the U bolt, provide mobility for the clamp and will also allow the clamp to open and close.
- Clamp or screw the frame to your bench – you can do this before loading the clamp or after.
- Put the ring clamp into the U bolt.
- Push the U bolt into the holes.
- If you have the back washer plate, that came with the U bolt, you can use it if the legs of the bolt are long enough.
- Screw on the nuts or wing nuts.


Things to consider:
- Is the clamp blocking drawers or cabinets? If so, think about using clamps instead of a more permanent mounting scenario.
- Is there enough space for you to add or remove the U bolts, if you want to?
- Can you add or remove the bench top clamps easily?
- Is the system high or low enough for you to work comfortably?