Disclaimer Page
Nancy LT Hamilton
Last updated: 7/12/23
Please see my video on the Basic Butt Hinge- How to Make Hinges.


Above are two basic hinges that you are probably aware of. The one on the left is a basic, odd-knuckled butt hinge, and the one on the right is an even-knuckled butt hinge.
Hinges are everywhere. We take them for granted and are oblivious to their work. That toilet seat would just be a board over a hole without the hinge, eyeglasses would not be too comfortable, and forget lifting that fork, covered with chocolate cake, to your mouth, without our knee, wrist, fingers, jaw, and elbow hinges.  Jewelers can take advantage of the plethora of ideas that are all around us. They are there for the borrowing – we just need to scale them down, tweek them a bit and solder the entire fabulous mess together.


There are tons of specialty hinges, like the ones for your laptop or a gate hinge.


There is a liftoff hinge (clasp idea, anyone?) and a quadrant hinge (whatever that is).


There are Hidden Hinges, Spring Hinges, Stand-off hinges, and Ear Clip Hinges; you get my point, right? They are everywhere, and you can probably replicate them. Hinge away!
Contents
Thoughts on Hinges
- Don’t forget your safety equipment: eye protection, masks, gloves, body armor (?), whatever step you are on; think: Okay, what can hurt me in this process? See my video: Jewelry Studio Safety, and web page: Safety in the Small Jewelry Studio.
- Making hinges requires the jeweler to measure correctly, saw, cut, solder, and file accurately. Hinges are an excellent method for increasing your skill level and teaching the importance of accuracy. Sloppy work, bad hinges. Don’t be afraid. Make a dozen of them, and make more. They are tough but worth the effort.
- Remember: Hinges will only work if they are straight!
- Things to consider: What is the function of the hinge? How much weight will it bear? In what direction will it open? How wide will it swing?
- Factors affecting swing: Thin metal and wide tubing = more movement. Thick metal and narrow tubing = less movement.
- If you have very thin metal or are making a hinge for a round or oval container, consider making a bearing. A bearing is a length of additional tubing that the hinge sits in.
- Cutting a groove in your metal for hinge placement is important because it helps to line up the knuckles when soldering and provides a stronger join by creating more surface area for the tube to be soldered onto. In the illustration below, the top image has about 1/4 of its surface area soldered to the metal. The bottom illustration shows the metal without a groove. The amount of tubing soldered to the metal is approximately 1/16th. Big difference, eh?

- If you are making a hinge of copper, silver, or high-karat gold, understand that what started as a tight fit will eventually start to loosen up. Also, the soldering process will anneal the tubing, and it will therefore be more pliable and, as such, more susceptible to loosening up (and bending). So, have a tight fit between your tubing and your hinge pin.
Learn how to make tubing with my video.
Making the Butt Hinge
The Butt hinge allows for a large amount of swing and is excellent for a hinged bracelet because of its flexibility.
These are the basic instructions for the hinge covered in the video.
- Size and pattern (if desired) two pieces of metal.
- File a bevel on each side of the metal. Be sure patterns, if any, are facing outwards. The bevels will angle downwards on the back side of the metal.

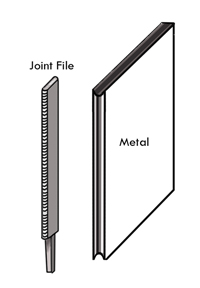
- Alternately, if your metal is thick enough, file a rounded groove with the joint file (see below). Don’t bother gluing the two pieces together or beveling them.
 Single sheet
- Using super glue (interesting article on super glues and Locktite by Johan Hugogård), line up the two halves – bevels facing each other. Don’t press the two halves together until they are in position. The bond will be immediate when pressed together. Clamp. Wait 10-20 minutes. Do something else for a while. Examples: wash the dog, practice riveting, fix your hair, work on another project, hmmm…

- Using the Joint File – These files come singly, also. Just type in “joint file” at Otto Frei’s website. (aka Chenier File – see note below*), chainsaw file (see the second note below)*, round needle file (rat tail shaped or graduated: not the best because it is not parallel) – file a rounded groove where the two bevels meet. When filing, think of filing in the center as this will help you to avoid over-filing the ends. You want an even, parallel channel to fit the tubing into. TIP: Try covering the edge to be grooved with Sharpie ink. It will show how evenly you are filing.
* I’d like to extend huge thanks to Charles Lewton-Brain for his help in deciphering the origin of the word “Chenier.” Per Charles: “Chenier files is French goldsmiths jargon from a couple of hundred years ago, also German (as the French informed the Germans). Scharnier is the German word (derived from French). Chenier means tube and hinge.”
* Chainsaw files are probably best for thicker metal. They come in 7 diameters (as far as I know): 5/32″, 11/64″, 3/16″, 13/64″, 7/32″, 1/4″, 5/16″. Here’s an inexpensive set of small chainsaw files on Amazon.

- Check the fit with the tubing – adjusting as necessary. You want the tubing to sit well in the groove.

Turning Tubing into a Hinge
- Cut a length of tubing that is longer than the metal. Have it be at least 5mm longer than the grooved slot. Resources for sterling tubing: Stuller, Rio Grande, Santa Fe Jewelers Supply, Otto Frei, FDJ Tool, and many others. Stuller, Rio Grande, Micro-Mark, and Reactive Metals. Also, check with your local hardware store.
- Draw a long line down the entire side of the tubing with a thin line marker. Use a cork-backed ruler to lift the ruler off the bench and make this easier. This line will be used for aligning our knuckles later in the instructions.

- Cut a hinge pin from either tubing or wire. Don’t forget that it should fit snugly in the tube (telescoping). Make the hinge pin at least 5mm longer than the tubing.

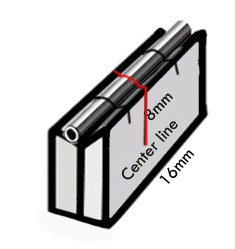
- Now, we need to determine knuckle sizes. Ideally, there should be equal amounts of tubing soldered to each side. This distributes the stress evenly. Here’s an example of how to find the length of your knuckles. In this scenario, the area where I want to place the hinge is 16mm long. To determine the length of the center knuckle, I need to divide the total length of the metal in half: 16/2 = 8. So, now I’ve got an 8mm piece of tubing to be soldered on one side. Since I want an even stress distribution, I’ll have to have 8mm of metal on the opposite side. I also need two knuckles – the two outer ones. So, divide the 8mm in half again. Leaving us with two 4mm outer knuckles. Our hinge might look like this, in a formula: 4mm + 8mm + 4mm = 16mm – the total length of our metal. Got it?
- Of course, you need to consider your design and how the hinge will appear. You might want to make evenly sized knuckles or another variation – consider how much stress the hinge will need to bear. Are you making a box with a heavy lid that will be opened and closed often? I’d go with a larger central hinge. Is it a locket with a thin metal cover that won’t be opened often? Then even hinges will probably be fine.

- Other design considerations: Try making the hinge from thicker tubing and using a smaller hinge pin, or try thinner tubing with a thicker hinge pin. Making a prototype is a good way to test the functionality of your hinge. It’s also good practice.
- Using the above formula, mark where the central knuckle will be on the interior groove of the two metal sheets and down one side. You only need to mark the center knuckle! I recommend using an Ultra-fine Sharpie, as you want the thinnest line possible. It is easier to measure accurately with a thin line. Ordinarily, I would recommend using a scribe (because of its semi-permanent nature and its fine line) but as we are drawing the line down the face of the metal, I don’t recommend it – unless you don’t mind the scratches! While you are at it, mark the center line. This is to help with the next step. Double-check your measurements and ensure they are as close to perfect as possible.
- As another option, you can file tiny notches (instead of the marker) on the edge of the metal, where the central hinge will sit. Use a square escapement file or square needle file (my favorite: Valtitan) to make the grooves.

- Marking the tubing. For this part, we are only concerned with the center knuckle. Since we are working with a piece of tubing that is not cut to size, we don’t care about the outer knuckles yet. They will be adjusted to fit after the soldering. Find the center of the tubing and mark the center with the sharpie or scribe. Remember, the tubing should be a little longer than the metal.
- You have two options on how to mark the central knuckle. Option A: Since you know your central knuckle length, divide that number in half. Using the 8mm example from above, that equals 4mm. Draw a line 4mm to the right of the center line (that you drew earlier) and 4mm to the left of the center line. This makes up our 8mm center knuckle. Or Option B: Lay the tubing into the groove, matching the center line on the tubing with the center line on the metal. Using the marks you made on the metal as a guide, mark the tubing for the center knuckle. Re-measure the tubing and check your numbers. Are both the tubing lines and the metal lines 8mm? Note whether to saw (the tubing) to the left of your line, right of your line, or dead center. The thickness of the line can throw your hinge off – with this 3-knuckle hinge, it’s not as crucial, as we made the tubing a bit longer. But get used to being accurate. It will be important in all areas of jewelry making.
 Option B
Back to the Metal
- After marking the metal and the tubing, pry apart the glued-together metal with a bench knife or other wedge.
- Remove the super glue with the torch (ventilate VERY WELL) or use Acetone, Super Glue Remover, or Bondini Remover (again: Ventilate well!). Pickle and wash.
Back to the Knuckles
- Cut the tubing into knuckles. Use a tube cutter (Bergeon brand), Multi-Angle Tubing Cutters, or a tube holding and cutting plier for the most accurate cut. Buy the best tubing cutter that you can afford. Some brands have too wide of a slot for sawing, making it very difficult to make square cuts. Whatever method you choose, your knuckles must be square and evenly cut. They must fit together perfectly.
I have two videos on squaring metal.
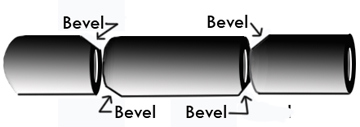
- Beveling the tubing: File tiny bevels on the ends of the tubing with an Equalling Needle File. You need to file a tiny bevel so it doesn’t show. See the illustration below for bevel placement (the bevels are exaggerated).

- You want to bevel the tubing to discourage the solder from running where it is not supposed to. Here’s where that line we drew earlier comes in handy. Bevel on the line – this way, you know that the bevels are in the right place and aligned.
Soldering
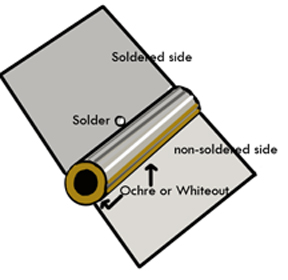
- Paint either Yellow Ochre or Whiteout along the interior, round ends of the tubing, and along the seams where you don’t want the solder to flow.
- To hold the knuckles together for soldering, use a graphite pencil lead, an oiled nail, or an oiled binding wire. You want a snug fit but not so tight that you can’t remove it. If you use steel or iron, you have to oil it so the solder doesn’t flow onto it. The oil will be burned up in the soldering process – ventilate well. You can use Olive Oil for this step.
- Arrange the hinge and metal on your soldering surface. Use either a Charcoal Block, Ceramic Honeycomb, or some other flat soldering surface to solder on. Push the lead, nail, or binding wire into the tubing and align the bevels on the tubing (using the line that we drew earlier). Lay the metal flat on its back, beveled/grooved edge facing up. Carefully place the tubing package onto the center of the groove. You will probably have to rearrange the tubing to ensure all is lined up. Double-check and check again that the knuckles are aligned.
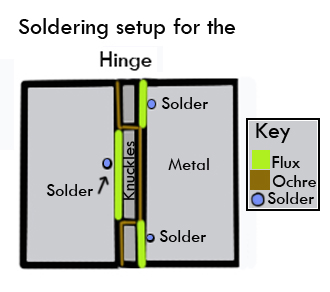
- Flux the tubing and the metal ONLY WHERE YOU WANT THE SOLDER TO FLOW! See the diagram below. Applying the flux with a small paintbrush will give you more control. Don’t flood the area with flux!
- I recommend balling up your solder (use HARD solder – if possible, as it will create the strongest join). Balled solder has less tendency to jump when the flux boils. To ball up the solder, cut tiny pallions, separate them from each other and direct the torch flame onto them. They will ball up. With a small paint brush dipped in flux, pick up the balls and place them in the correct positions, snugly against the tubing.
- Turn on the torch again, and direct the flame towards the area with the most metal. In the illustration above, that would be the metal areas. Bring the torch tip towards the knuckles and watch for the solder to flow. By heating evenly, you will avoid the solder jumping to one side. You want the solder to flow down the groove AND the tubing.
- Quench in water, remove the temporary pin (binding wire, nail, leads), pickle, neutralize, and wash with soap and water. Don’t throw the whole setup in the pickle, as you’ll end up with copper flashing all over your piece.
- If, for some reason, you end up with solder where it doesn’t belong (oh, the shame!), re-heat until you reach the solder flow temperature and either with Soldering Tweezers (aka Cross-lock Tweezers) or a Soldering Pick* knock the knuckles off. Sand down the solder a little to remove the skin – you don’t have to remove it all unless it makes the hinge uneven. Start over with aligning, painting on resist, flux, and adding solder. Good luck this time. Another option is to toss the whole thing and start anew. Alas...the beginning of the “Box of Rejects”!
* Make your own soldering pick with a small dowel and a sharpened piece of iron coat hanger. First, drill a hole smaller than the wire, drop in some glue, and shove in the wire.
Hinge pin: Testing and Riveting
- Now, let’s test that hinge out! Slide in your hinge pin and open your hinge.
- If the pin slides in smoothly, move on to riveting. Your hinge should look like the illustration below, with most of the tubing showing on the backside.

- If you skipped the beveling method, your hinge should look like this:

- If your hinge pin doesn’t fit in, you may need to ream out the tubing to align it internally. Use a Cutting Broach to do this. The broach is a five-sided cutting tool that comes in a variety of sizes. Put the broach into the hinge, slowly rotating it, one hinge at a time, clearing away metal. Pull the broach out often to remove metal buildup. Check the fit of the hinge pin often. Be careful not to remove too much metal. Remember: tight fit!
- Before riveting, remove the hinge pin. If you have a lot of tubing sticking out past the metal, trim it with the saw. Don’t trim it too, too closely to the metal. It is better to leave a bit and use the file to level it out. Clean the edges with sandpaper until they take on the finish you want.
- Re-insert the hinge pin.
- Trim the hinge pin. Leave 1 1/4 to 1 1/2mms of wire or tubing on each side of the hinge. This will allow you enough material to rivet the hinge in place securely.
- Using a steel surface, like an anvil (this one will need the top surface refinished) or a steel block, and a ball pein hammer, rivet the Hinge Pin into the hinge.
- Check out my Basic Rivets page on my website and the video below.
- Another riveting method is to melt a small ball on one end of the wire (with the torch) and either rivet or ball up the other end – see the image below. Use a cup bur to round and clean up the ends after riveting or melting. Rio Grande sells a set: Item No. 346116. You can also buy them individually. I LOVE Busch’s Twincut burs. They don’t clog and are more aggressive than regular cup burs.
- Check out my chart on What Size Bur to Use With Which Wire Gauge.

- Another method for a hinge pin is to use a wire that is a bit too big for the hinge. Point one end of the hinge pin. Check for fit: If it is too tight, you can thin the wire by putting it in the flex shaft and spinning it on sandpaper. You want the pin just tight enough to fit in. Care must be taken so that it doesn’t warp or bend. Watch your fingers. Wear eye protection.
- Holding one end of the wire in the flex shaft, insert the pin into the hinge and gently twist the pin in. A big drawback to this method is that the wire can snap off in the hinge – then you need to drill it out. A positive reason for using this method is that the connection between the hinge and the hinge pin is very tight. You also don’t have to rivet it in, as the tight fit will hold it in place.

You are done with hinge #1!
- When you move on to the next hinge (if you are doing a hinged bracelet), keep the prior hinge away from the torch’s heat as much as possible. You don’t want the other hinge un-soldering itself; nope, you don’t!
- When making a bracelet using the Butt Hinge, think about making a hinged clasp. It will fit in seamlessly or stand out – depending on your design.
Some Final Notes on Research
Fabulous books and articles to check out:
- Hinges and Hinge-Based Catches for Jewelers and Goldsmiths (catchy title!) by Charles Lewton-Brain. This book has a ton of information, including directions on how to make that hinge-based bracelet clasp. Charles is very prolific (as a jeweler, researcher, and writer – I’m sure that he’s prolific in other areas too, but I’m too jealous to even think about it) and has written and published many articles on Ganoksin and written several books. Here are a few Hinge related articles that can be found in the (above noted) book and on Ganoksin: Basic Hinge Making (some different techniques than discussed here), Basic Knuckle Options, Hinges with Bearings, Other Hinge Pin Installation Options, Hidden Hinges, Ball, Strip, Coil, and Other Hinges.
- The Complete Metalsmith by Tim McCreight. Good section on hinges and tons of other vital information.
- Modern Lockets by Nanz Aalund published at Ganoksin.
- In case you were interested (I was), here’s an e-article on How to Make Sunglass Hinges by Simone O’Shea.
Thanks for taking this long journey with me. If you have any questions or corrections, please, let me know. Take Care. Nancy LT Hamilton