Nancy LT Hamilton
Last updated: 9/17/18, 9/8/18, 3/4/18
On these pages, you’ll find tips and tricks to make your own jewelry tools, adapt them or find ways to save money on them. As jewelers, we need to always be solving problems – probably my favorite part of the job – and here are a few I’ve worked out!
Also, Check out my Pinterest page: Jewelry Tool and Material Storage and also, Metalsmithing Tools (Pinterest) for more ideas.
Contents
Bench Pins
 Here’s my very chewed up pin – I’ve changed the design somewhat. See this link for my pattern to make your own.
Make your own bench pin.
- I cut them from 1″X4″ pine boards – with a jigsaw.
- Just glue the pattern to your wood – taking advantage of straight edges (less cutting).
- You can cut in whatever shapes you want for your own specific sawing/filing needs.
 The bulging areas, at the top of my pin, are for either screwing/bolting onto a workbench or applying C-Clamps – if you don’t want to permanently affix the pin. I like 4″ or 6″ C-Clamps. Take into consideration whether you have a lip on your bench top to screw the clamps onto and the thickness of your bench plus the thickness of the bench pin. Purchase clamps that will encompass both thicknesses. Harbor Freight has C-Clamps as do all hardware stores.
- I generally use two C-Clamps

Here’s the link for my Bench Pin pattern on Google Drive.
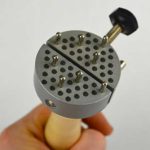
Center Finder – Precision
I have an old newsletter: In the Studio with Nancy, that includes instructions on how to make one.
This link to Instructables shows you how to make your own center finder. I have not done this – yet! You can also buy one – they are getting hard to find. See Penn Tools.
Chasing and Repousse Tools
 Here’s my original pitch bowl – that I used for years! It’s a tin lid. I stuck it into a toy truck tire (since lost). You can also make or buy a sandbag and sit it in that. Small, wheelbarrow wheel replacements can work too to hold whatever bowl you are using.
- A small, stainless steel, round mixing bowl can work 4″ or 6″. Remember: pitch is pricey so, keep the bowl as small as you can and still be able to work. You also don’t want it too deep. Some people add a layer of concrete or plaster to the bottom of the bowl and then add the pitch. See my page on Pitch for more information. Don’t forget to check resale shops for these bowls. Don’t use glass!
- Rio Grande now carries inexpensive, 4″ chasing bowls. It’s that costly pitch that makes the costs go up. It is not recommended that you make your own pitch. It is very messy, very hot and produces caustic fumes. Try to avoid the black pitch and go with green or red. Once again, see my Pitch page. At Rio Grande and other jewelry supply houses, you will be spending about $45.00 for it. The bowl is only $25.00. But, the pitch lasts years and years – if you take care of it!

Clamps and Vises
Tube Cutter Adaptation
This was one of my favorite adaptations because I had a way to hold the tube cutter while using it. The metal fits across the “V” in my bench pin allowing me to use both hands to saw and hold my material.
An unforeseen and fabulous added benefit was that the brass plate catches errant bits of tubing and wire, that otherwise, would have ended up on my floor! It’s easy to make too. I’ve only done this on my tube cutter, the Bergeon Tube Cutter. Rio Grande, Otto Frei, Esslinger, among others, carry it. (Click on images for larger view).


Ring Clamp Conversion
 Ring Clamp Conversion – is the wedge constantly falling out of your ring clamp? Try this to guarantee a secure hold!

 DIY Workholding System with a Ring Clamp – Use with the ring clamp. Make this for about $7.00 using scrap wood!

Universal Work Holder Adaptation for the GRS BenchMate Work Holder
 Frustrated with not being able to use my universal work holder efficiently – i.e.: It wasn’t really secure in my bench pin and I wanted to be able to rotate and angle it while setting stones – without the fear that it would just slide off the pin, I decided to adapt it for the GRS BenchMate.
I had no idea exactly what lay beneath the wooden handle and had never attempted to hack up a universal work holder before so, my methods were a bit haphazard. I bet there is a better way – perhaps purchasing the central pin (that I fought so hard to remove) separately and not bothering to dig it out of the handle but, I was curious and couldn’t wait! I’m going to look for a substitute at the hardware store today!
 First, I unscrewed the top. Next, I had to devise a way to get the screw-thingy out of the handle! I used my jewelers saw, which I don’t recommend unless you have a nice BIG blade! I had to saw through the metal band and remove the wood around the screw-thingy.


I also didn’t know how long the screw-thingy was so, didn’t want to use something with power as I could hurt myself. So, I just started sawing into the handle until I hit metal. I then sawed through an area, right beneath the spot where I hit metal. Next, I started cutting the cut-off section, in half so that I could dig out the screw-thingy.
Success! The screw-thingy was free!  But, boy, that wasn’t fun!
 Next up: cutting the screw-thingy so it didn’t stick out too much from the GRS. I sawed off a chunk and noticed that it wasn’t solid brass. I hoped it wasn’t pot metal because I planned on soldering a piece of thick brass onto it. (It split in half after sawing???)
 Cut a slot into the screw-thingy – wide enough that the brass fit in tightly.
 Held my breath (is it pot metal??? Gulp) and soldered, with silver hard solder, the “pin” (the brass sheet metal) into the screw-thingy. It didn’t turn into a puddle of molten metal! Yay!
Put the soldered screw and metal into the pickle to clean it up. There must be steel under that brass as it was completely covered in copper flashing. Brushed some off – who cares if it looks like copper?
 Screwed the top back on and I’ll be creamed in spinach if it didn’t work!
 The finished adapted work holder in the GRS!
Read on, if you don’t have a GRS. I have a solution. A cheap one.
Thermoplastic Work Holder for Stone Setting and Universal Work Holder Clamp
Bezel setting using thermoplastic to hold the piece in place: 
Other types of thermoplastic (besides those in the link): Jett Sett, Thermo-Loc, Instamorph, etc. Follow instructions, as each type is slightly different. There are quite a few videos and web pages on thermoplastics for jewelry making.
 This simple tool will hold thermoplastic, that you set your piece into, for stone setting. Especially useful for setting cabochons. You can also use the holder with the Universal Work Holder – if you saw off the handle.
 Universal work holder in PVC.
  Sawn-off handle.
We (my friend Rigo and I) created this tool from a 1″ diameter wooden dowel, 3″ X 3″ (approx.) square block of oak and 1″ PVC pipe. (PVC pipe is measured by the interior dimension – the “Bore” – not by the outside dimension) and some “perforated metal hanger straps“.
 Perforated metal hanger strap
We used a 1″ X 6″ X 6′ board of red oak, (you could use pine too) cut it down the middle and then cut off 3″ sections. A 1″ X 6″ X 6′ board actually measures: .75″ X 5.5″ X 6′ so, you don’t get a perfect 3″ X 3″. You could do that, if you so desired, and if your inner perfection-seeking-self insisted on it! We just went with 3″ X 2.75″ square-ish shapes because we were trying to get as many holders as we could from one board. We needed quite a few for Chimera Arts (I am co-jewelry director there and I teach jewelry making there too). So, quantity, rather than perfection, was our goal.
Next, the dowels were cut into 2″ – 2.5″ lengths.
Then the PVC was cut into the same length as the dowel.
 Center the wood square on the dowel and drill two holes, slightly smaller than your screw, on the top of the square. If you only use one screw, the top will spin. You can add a bit of wood glue too, if you are feeling perky.
Screw the two parts together (after adding glue to the dowel). I like drywall screws but, you can use any that you have laying around. Probably 3/4″ to 1″.
Locate, on your desk, where you want the holder to be. Usually, when setting stones, I like my work to be chest height (like my bench pin). Chest height is a variable area so, adjust the work holder to where it feels comfortable. You don’t want to be bent over as that can cause neck problems.
If your desk is too short, you can mount a piece of 4″ X 4″ to the top of the desk and add the work holder there. You might also want to place your bench pin on the 4″ X 4″. You can also raise your entire bench up with blocks of wood, screwed into the legs.
Here’s my design for your 4″ X 4″ desk raiser. Obviously, it’s not to scale!

Let’s finish the work holder: Screw one side, of the metal strapping, into your desk. Place the PVC into position and bend the strapping over the PVC. At this point, especially if you want to be able to adjust the height, I’d mark where to place a bolt. Drill out a hole that your bolt will fit into. Use a wing nut to make it easier to unscrew – if you want to move the PVC tube up or down. A friend is a useful tool for this job!

To move the work area up or down unscrew the wing nut, which loosens the metal hanger straps and then slide the PVC up or down. Tighten down when you’re happy with the height. Feel satisfied and party like it’s 1999!
Drawbench

 I don’t have instructions, per se on this project but, it’s easy – if you have the right resources. I found an old hand-cranked winch and a piece of “U” shaped steel. Bolted them to a piece of wood (set about arm’s length apart). When we use it, we clamp it to the bench. The rest of the time, it’s stored.
Drilling Related
Drilling Pearls
 Thought this was a fabulous idea to enlarge the holes in pearls! This from Barbara S. Fernald. Smart!
Try Barbara’s technique with a diamond coated saw blade for enlarging holes in stone/glass/gem beads. Add a drop of water onto the blade to keep the dust down and to lubricate. Wipe moisture from saw frame afterwards so you don’t get a rusty frame!
Drilling/Work Surfaces
 The Bench Block is such a simple, useful tool! Drill on this instead of on your bench pin! The steel block is great for denting the metal with a center punch (to hold the drill bit in place so that it doesn’t skitter off!). You can also use it for small forming tasks and, if it’s square, as a check for square edges. You can also store your drill bits and any other finishing tools in the holes. Drill holes to match the shanks of your bits.
Another benefit of the block: It can straighten wire. To do so, place the wire on your bench top or a steel block, position the plain, wood side over the wire and while pressing down, roll backward and forwards. This is a great technique for straightening wire – especially thicker wire.
- To make the Bench Block: determine the size that you want. The gauge of steel, I used, was 14 gauge. Find or order a piece of steel that fits on the block. Usually, though, you will have to order at least a 12″ square piece. So, you will need to cut it. You can cut it with a jewelers saw, hacksaw, mechanical steel cutting tools like laser cutters or plasma cutters or find someone who can cut the sheet up for you. It is not easy to saw but, it is possible. Cut a few different sizes, while you are at it. Cut a larger piece to use as a hard work surface for your bench. Great for forging on or rolling wire.
- The size of the steel piece on my block is 3″ square (7.4 cm).
- Watch that the steel dust doesn’t intermingle with your other sweeps. You can use a magnet to clean up any stray particles. Brush files well. A firm toothbrush works or a file card. I’ve also used stiff paintbrushes for this task.
- For the wood: I used pine a 1″ X 6″ board and cut out a square that was: 13.8 cm (approx. 5 1/4″ square). You can make it larger or smaller – depending on your space and needs.
- I cut the wood with a jigsaw but, you can use any wood cutting tool capable of cutting complex shapes.
- You can also use chisels or a router too, to cut out a recessed spot for the steel. Brush away or use a multi-purpose compressed air duster like Dust Off. You want to do this to have a dust free surface for the epoxy to bond to.
- Use either a two-part epoxy or a strong glue like E6000 to attach the steel to the block. Clamp the metal in at least two places – preferably more – and don’t touch it for a day.
Flex Shaft Tools and Adaptations
 Okay, this is jenky. You’ve probably seen it in one of my videos before. The great thing about this flex shaft holder is that it was free (sorta). I had an old paint roller, a broken handle, and some leather scraps. I stuck the roller into the handle, cut the leather into strips and screwed the leather, over the handle, into my bench (in 2 places) and violá! A flex shaft holder.
  Hey, it works! It’s also great for holding the chuck key.
 Flex shaft AND chuck key holder.
Jump Rings
 Jump ring cutter from Wombatmorrison at Instructables came up with this idea.
 Don’t have or want to spend money for jump ring mandrels? Well, this transfer punch set from XtremePowerUS will do the job. Just tape (masking or painter’s) the end of the wire to the mandrel, put into your drill or winder and wind away!
Mandrels
Bracelet Mandrels
 This is a handy tool for drilling curved metal. I like it for drilling holes when I am riveting elements onto a cuff bracelet.
- To make: I just cut a section of 1″ X 6″ pine board, for the base. Drilled a hole, the size of the dowel I was using.
- The top element is a part of an ax handle that I cut up with my jigsaw. I made quite a few, differently sized mandrels from that one handle!
- I drilled another hole (obviously, also the same size as the dowel) into the bottom of the ax handle.
- Apply some Gorilla wood glue or other wood glue into the dowel holes. Tap in the dowels and let it sit for 24 hours.
- Match your drill bit to your dowel size. You want a tight fit for the dowel. The dowels I used are 1/2″ wide and 4″ long. The ax handle section was also 4″ long. Use a straight ax handle.
Forming Mandrel
 In a pinch or if you need a few for a class, these slumping bracelet mandrels work well enough when shaping a cuff bracelet.
Storage
Here are a few of my storage ideas. I’ve collected other people’s ideas on my Pinterest page: Jewelry Tools and Material Storage.
 This one is such a useful idea and fits many categories so, I’m just putting it here, all by its lonesome! Idea from Pinterest via Patrick Kusak. Files, saw blades, tools, scribe, paintbrushes – great idea! Could even add a little weight to the bottom is it got top heavy – like pouring a bit of plaster into each “sicle” hole. I couldn’t find this mold anywhere – and I searched and searched. Ah well…
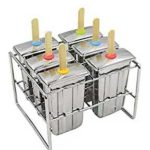 Found these cool popsicle thingies while I was searching for a link to the one above. Without the tops, these would make nice storage for many different things. Onyx Stainless Steel Popsicle Molds. Here’s another one from Onyx.
Mandrel storage, file storage, tubing storage, dowel storage, pencil storage, etc.
 Large files, bezel mandrels, and large mandrel storage. I just purchased various diameters of PVC. Then, I measured the tool it was going to hold and cut to length. I used a skill saw with a blade designed for plastic. Watch the kickback when cutting rounds. I found, that if I started my cut towards the bottom, with an acute angle, it reduced the amount of kickback. Some stores may even cut it to size for you – just ask! You can store anything in these tubes – like tubing – as well as files and mandrels.
  (Mandrel storage)
- I assembled my cut pieces and laid the largest ones on the bottom. I measured the width and depth and then, cut a piece of 1X6″ pine board slightly larger than my bottom row of tubes.
- Put on your gloves and pull out your PVC glue. Glue the first two together. Tape (blue painters tape works well) together until set. It doesn’t take that long.
- Add the third tube, tape, wait, continue with the rest of the row.
- Add the next sized tubing to the top of the bottom row. Add PVC glue to the bottom of the next tube and onto the corresponding area, on the bottom row, where it will touch. The new tubes will fit into the crack between the bottom tubes so, check where they will sit – mark if necessary. To hold in place, slide something round and heavy into the tube – like a ring mandrel – whatever will fit. The weight of the mandrel will hold it in place. You can do several at once for this layer and all consecutive layers.
- Keep building up layers – with the smallest tubing on top.
- I didn’t attach my pyramid of tubing onto the wood but, you might want to. I’ll let you figure out how!
- Do the same thing for your larger mandrels
- You can also create just one row of tubing, Cut a piece of acrylic or just glue another tube of PVC to the bottom. Then you could mount the whole thing on a wall or inside a cabinet door. Just make sure that your tool doesn’t slip into the tube – never to be seen again! Maybe mount with two old belts (junk store trip) that you pull tightly and then screw into the surface.
- I love sheetrock screws! Dem are my girls! If screwing into metal, get self-tapping screws. So much easier. I added most of the stuff onto my art car with self-tapping screws and silicone.
 Here’s another take on my idea from Ashbee Designs.
Saw Blade Storage
 My favorite system for storing blades is with this test tube spice rack. Write the file size on the top. The advantages to this system: the blades fit perfectly inside, you can see how many you have left and you can attach it to the inside of a cabinet drawer or to the side of a wall.
Other ideas:
 This is a cool DIY jeweler’s saw blade storage idea. You can paste a copy of my saw blade chart to the side! Idea from Joseph Treadwell on Pinterest.
Lumber Jocks presents this idea:  More PVC uses!
Draw Plate Storage
 Draw plate storage – use a CD holder or wire desk inbox. Michael Sturlin uses one!
  Here’s one I found on Amazon. There’s also an adjustable one.
File Storage
Files shouldn’t rub against each other. You really shouldn’t just chuck your files into a drawer or toolbox because, you can damage the teeth on the file. It can be challenging to protect your files especially, if you’re like me, and you have a bit of an obsession with them. My motto: pliers and files – you can’t have enough of them!
So, what to do? Well, here a few of my solutions. There are probably a zillion other methods. Check out my Pinterest Page: Jewelry Tools and Material Storage, for other great ideas.
As you might have seen, at the beginning of this section on storage, I created file storage using PVC tubing and PVC glue. 
My smaller files are stored in two different ways: one in a silverware drawer insert – with each file facing in a different direction – and the second involves this thing I made from acrylic sheet and a lot of rare earth magnets – plus a bit of wood.
 Silverware drawer insert file storage.
 Magnetic, desktop file holder.
Enamel Storage
I separate my enamels into: 1. opaque and translucent and 2. by color. These plastic parts drawers work well because I can see the colors. Although, they are good for sample sizes they don’t work for the larger jars of enamel.
 Parts storage container with drawers. There are 24, 4-3/8-Inch x 2-Inch x 5-1/4-Inch drawers. You could even label them if you are the very organized type (unlike me).
 For the 100 gram jars, I found this wall-mounted spice rack that should work – I just ordered one from Amazon. The jars of enamel are 2 1/8″ wide and 1 3/4″ tall. The rack is a little over 3″ wide so, it should work. We’ll see…
Charts
 This isn’t really storage – just thought I’d throw it in: I keep my Drill Bit Chart, Ring Blank Charts and Color Chart for 3m’s Polishing Papers, on the interior, cabinet door – for easy reference.
Gemstone Storage

 A few weeks ago I dropped into Costco for a “few” things. (Right!) Accidentally purchased this box of Ferrero Rocher’s. My husband and I diligently worked our way through the (delicious) chocolates so that I could use the container for gemstone storage. We rationalized that the calories should be considered guilt-free as our gluttony was in the service of recycling. Honestly though, the box is great for gemstone storage and the container only cost a few pounds (ahem). Might need some more storage any day now. Hmmm…
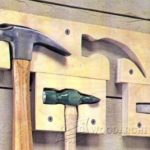
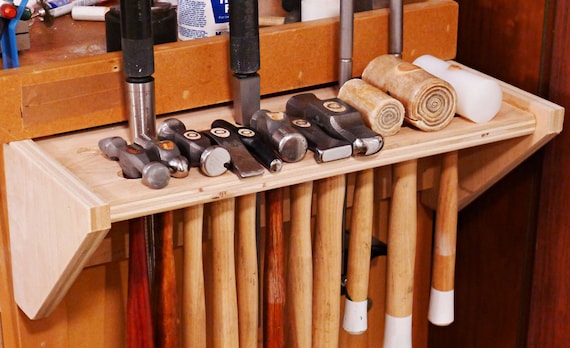
Hammer Storage

 These “Garage Hooks” are on the interior of my cabinet, at my bench. I keep, often used, hammers here like my mallets and my chasing hammer.
 this is storage for my least used hammers. Once again, I used garage storage hooks.
 This rack is behind my chair – easily reached. There, my medium use hammers are stored.
Ideally, I’d like to have all the hammers in one area but, I don’t have the wall space. I’m still working on storage ideas for hammers.
 Maybe, I’ll bribe, cajole, browbeat, my husband into making me one of these!!! From Pinterest via Popular Woodworking Magazine.
 I can, pretty much, forget about getting my husband to do this but, it’s pretty! Hammer Rack from Wood Archivist.
 You can actually buy this on Etsy at Rolling Thunder Wood‘s site. Probably easier than getting my husband to make one similar.
Plier Storage
 This works for my seldom used pliers, shears and other random “stuff”.
 My main plier area – just a piece of bent aluminum, screwed into my cabinet door.
 This is interesting. At Amazon. Pliers Rack and Organizer.
 I like this too. Think it would be great for files too! Tools Sorters Pliers Organizers.
Rust Prevention
 These little things are in many products that we buy. Instead of tossing them, throw them into your tool drawers to keep moisture down. Great for those of you living in humid areas. Gabi? Maui?
Sanding Disc and SANDPAPER Storage
 Just a little plastic box for my sanding discs. I’ve had them in holes on my workbench but, I kept knocking them over. I keep spare discs and mandrels in here too.
 Another simple adaptation for holding small pieces of sandpaper and sanding sticks. It’s a bread pan. Works for me.
 My other sandpaper storage system. Stored in manilla folders in my file cabinet.
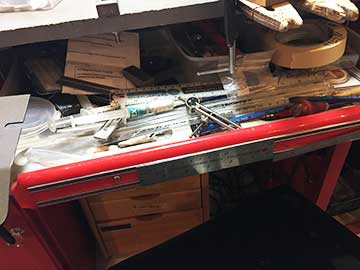
Workbench Storage
 Homemade benchtop storage and organizer. Made by Ariel at Chimera. Nobody wanted it so, it now sits on my bench. I lined one section with large PVC tubes and stuck in scissors, files, and other things. Love it! (Added 9/17/18
 I used an under-desk pencil storage drawer under my bench. Since I don’t have a jeweler’s bench, I created a work drawer with this sucker. I can also use it as a sweeps drawer. I just pull out the drawer and place a small plate or a shallow bowl under my bench pin.
 Bur and Tool Holder – Gesswein via Amazon. I just ordered one of these. Let’s see if I ever come back to this page with a review!
Wire Storage
 These reels of wire are stored on a dowel. I found an old towel bar, altered the ends of the dowel and voilá! I just reel off the wire as needed. Although, it’s a pain to add a new reel – I have to take the whole thing apart. But, that’s not often – haven’t done it in a year or so.
 My favorite method for organizing thicker wire is to use notebooks and clear binder pockets. I label each page with the wire gauge and break the binder up into: square, round, 1/2 round, etc. I have separate books for Argentium, Fine Silver and Sterling.
 Here’s my Three-Ring Binder for sterling.
 Had to add this one because it’s such a great, easy, cheap solution for power cords and you could also store large wire this way! A great excuse to drink more wine! Thanks, DIY RV.