This page, like our journey through life, is a work in progress. Thanks for understanding its imperfections! Nancy
Contents
Here is the link for the pinback patterns. It is a Google Doc.
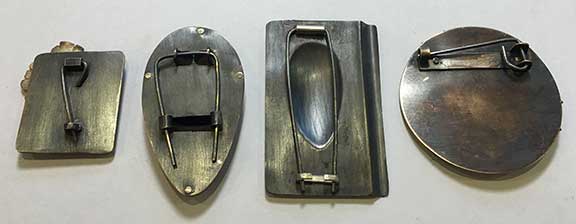

There are many different styles of pin backs. A pinback should enhance the beauty of your work yet, provide a strong, secure holding mechanism. Try to have your pinback look like part of an intentional design.
The pin backs presented here are simple mechanisms. There are other types of pins that are much more complicated and may or may not involve the use of safety catches. Maybe someday, I’ll write about those but, for now, let’s start at the beginning!
I recommend that you make a few different types of pin backs before embarking on your final piece. Creating a few pin backs will help you to decide on what type of pin back will work best for you and you will also see why the 5 basic fundamentals make a whole lotta sense.
The 5 Basic Fundamentals for a Pin Back
- The Pin Stem: This is the long, pointed part of a pin. The ideal pin stem will be rather stiff and springy. It will be tapered and highly polished. The tip of the stem should be rounded because a rounded tip will move the fibers aside instead of ripping through them. Wire for stems should be round, hard and springy.
- The Catch: The function of the catch is to hold the pin stem and, usually, to cover the point of the stem. There are many types of catches that we will cover, in more detail, below. All type of shapes and materials can be used for catches. They don’t need to be uber strong – just strong enough to withstand use and to hold the stem securely in place.
- The Joint: This is where the pin stem is connected to the pin. As with stems and catches, there are a variety of styles that can be used. The joint should be sufficiently strong to withstand the movement of the stem and to hold its shape so that the pin stem doesn’t fall out.
- The Spring: A type of mechanism, be it just a bend of wire or a bridge, that causes the pin stem to be tensioned while it is held in the clatch.
- The Lift- aka: Spacer but, there is another type of spacer (see below): Its job is to lift the pin stem off of the surface of the pin back – creating spring. You don’t always need a spacer. A lot depends on the type of wire used for the pinback and the design.
Note: Double Pin Backs work best if the length of the legs (the stems) are at least 3x’s longer than the width between them.
 How to calculate the distance for the pin stem legs.
Try not to make the joint too close to the catch – it makes it very difficult to open and close the pin!
Materials for Construction
Sheet, Tubing and wire for joints and catches
You’ll want to use stiffer metals for your catches and joints. Here’s a brief list of good metals for clasps: Brass, Bronze, Golds: white, yellow or green – 10K, 12K, 14K, Sterling Silver, Argentium Silver, Steel, Stainless Steel, Platinum, Nickel, etc.
Wire for pin stems

I like stainless steel for pin stems because they:
- It doesn’t interact with sodium bisulfate pickle causing copper flashing
- It is strong and springy
- It polishes to a bright shine
- It is inexpensive
BUT! Don’t solder with the pin stem in place. Steel does not work harden like silver, brass, bronze, etc. do. The steel will need to be hardened by using the method described here, on my Making Chasing and Repousse Tools page.
Actually, if you can avoid it, don’t solder with your pin stem in place. You’ve gotten it all work hardened by shaping it so, if possible, leave the pin stem out of the heat!
Other hard metals to use for stems: low karat golds up to 14k, bronze, brass, sterling silver, Argentium silver, platinum, nickel, steel (watch in pickle!), steel piano wire, stainless steel spring wire, etc.
A Tip: make sure that your pin stems are work-hardened before use – this makes them less likely to lose their shape and gives them more spring – for resistance allowing them to snap into your catch. If you’ve accidentally annealed them, place the wide end into a leather protected vice, tighten it down, then grab the pointed end with some tape coated flat pliers (don’t want to mar our shiny stem!) and give the wire a twist or two – in either direction.
Gauges to Use
Sheet Tubing and Wire Gauge for Catches and Joints
Usually, you’ll want to use a gauge that will ensure strength and stability for your catches and joints. A thicker walled tubing will work better, last longer and keep the pin stem steady and secure. 18 to 16 gauge wires for catches will withstand the stresses placed on it. Sheet metal: 22 gauge and up to have the strongest connections.
Wire Gauge
The gauge of the wire that you will use will depend, a lot, on the size of your brooch and it’s pin. Also, the type of wire that you use will affect the gauge chosen. You should consider what type of material you want your pin to go through. A bulky, loosely knit sweater will be more forgiving of larger gauge pin stems than a silk blouse.
If you are making brooches that will need to work with a wide variety of fabrics, use 22 – 18 gauge. Make test pieces first, wear them and see how they hold up with repeated use and with a variety of fabrics. A lighter brooch can have a finer pin stem.
Pin Stem End
 (A properly rounded pin stem tip). Things to consider: are the stems causing tears or permanent holes to form? Perhaps, if this is the case, you should add a note (if selling your brooch) that this works best with: _______ fabrics or check the tip of your stem. Make sure it is rounded.
In the beginning, you might consider putting together a little book of material swatches to test your stems on.
Construction
 Laying out multiple pinbacks on the same piece of sheet metal.
Note how I’m taking advantage of the machined edge (bottom of image) and butting the edges of each back together. That way you only need to make one cut per two edges. Not-so Lazy here!
Measuring the wire for the pin stem.
For a double pin stem:
Measure the length from the joint to the catch. Double that. Add the width of your joint and add that. Add a bit more for bends and filing – about 2 – 4 mms.
For a Single Pin Stem
Measure the distance from the hinge to the catch. Measure the width of the hinge. Decide if you are making a “foot” or a coil and add additional material for that.
Spacers
 If you are making a brooch that is to be worn on thick fabric like a jacket or a sweater, you may need to use a spacer to allow more room under the pin stem, for fabric. Use a joint file, approximately the same gauge as the tubing to file a long groove into the spacer. The spacer should be made of a gauge that is sufficiently wide to accommodate the tubing.
Placement of Pin Back
 When placing your pin back, make sure that it is located on the top third of your piece. Also, point catch downwards and place catch on left side (if looking at the back of the piece) for right-handed people.
 If you are centering the pin stem vertically, generally, it should be centered on the piece. The joint should be on the top and the catch on the bottom.
Fin
There are a 1000 different types of pin backs and brooch backs. Just check out some of the following links, And you’ll soon figure out how to design your own. Have fun.
Reference Materials
- Fluxplay: Simple Brooch Pin Backs. October 12, 2011. Web.
- Angulo, Lorena. Krafthaus. Behind the Brooch. January 11, 2012. Web.
- Lorena Angulo: Behind the Brooch: A closer look at backs, catches and pin stems.
- Randy Hengl. Guild of Metalsmiths , Metalsmith – V 21.2 : Springs. June, 1997. Web. Making and working with springs and spring steel.
- Brooch Backs and Jewelry Details, Pinterest. Web.
Related Videos
- Brooch and Pin Backs: Part One and Part Two.
- Tapering and Drawing Wire
Related Web Pages