Last updated: May 10, 2018
Nancy LT Hamilton, author
Contents
Welcome to an ancient and beautiful, if challenging technique. There is something very satisfying in producing a raised, intricately detailed form from a blank sheet of metal.
Chasing is the art of creating design on metal, from the front side.
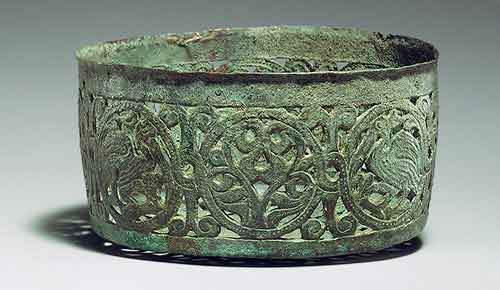
A Syrian Bronze, chased and pierced vessel. Circa: ca. 700
Repousse´ is the act of pushing the metal up, from the back side. Work can be Chased alone or Repousse´d alone or the two techniques can be used together. This quote from Oppi Untracht’s book, Jewelry: Concepts & Technology (great book BTW) explains the origin and correct usage of the word: “the English word used for this process is derived from the French verb repousser, literally ‘to push again’; colloquially ‘to thrust back’, and its adjectival form, repousse´, a word that has come to widely (though incorrectly) used as a noun to designate this work. The proper noun is repoussage and the adjectival form should be used as a descriptive term as in repousse´work.” Briefly: The verb is Repousser, noun: repoussage, and adjective: repousse´. Whew.

Gold Cuff circa: 1830, with repousse´d frame.
First off, I recommend purchasing this book: Chasing and Repousse´: Methods Ancient and Modern, by Nancy Megan Corwin. Not only is it a great educational resource but, it is also beautifully illustrated. Another amazing source of information is Charles Lewton-Brain’s: Lost Books CD: Chasing and Repousse´ you can get it at Brain Press or at Rio Grande.
Image by Billie Lim
Metals for Chasing and Respouse´

Non-ferrous metals such as Copper, Commercial Brass, Bronze, Silver, Sterling Silver, Argentium Silver, Yellow Gold, Nu-Gold are all great for chased and repousse´d work. Other, more unusual metals that work well for chasing and repousse´are: Mokume Gane, Aluminum, Bimetal, Shakudo and Shibuichi. Please see my page on Wire and Sheet Metal for more specific information.
Low Carbon Steel – aka: Mild Steel, can be used for chasing and repousse. It’s a lot easier to work with when it is red hot. It is less malleable and, therefore, less easy to work when cold – especially when compared to other metals. It is a softer steel than those used for chasing tools but, I would assume (as I’ve not chased or repoussed steel) that the tools would have to be refinished more often. Heavier tools (hammers and punches) are recommended.
Purchasing Chasing and Repousse´ Tools
Chasing tools can be purchased, pre-shaped. But, some manufacturers don’t finish their tools. Sometimes tools will have rather sharp edges, which can puncture and tear your metal. Also, you want your tools to glide across the metal, not get stuck. So, you will might need to finish your tools when they arrive.
Honestly, the way to make sure you have the right tools, is to make your own. It’s not that hard and you can customize your tools to your needs. Saying that, it’s not a bad idea to purchase a few loose tools – rather than sets, when you are starting out. There are some basic shapes that will help you get started and you don’t have to immediately jump into tool production.
I say buying “singly” because most sets have tools that you probably won’t use – either very often or at all. Personally, I think purchasing or making tools, as the need arises, will result in a set of tools designed for your specific needs. I know people who have spent tons of money on chasing and respousse´ tools that they don’t know what to do with. If you don’t know what a tool is for, how will you use it? Of course, when I started out, I bought a set of C&R tools. They looked nice but, I didn’t know what to do with them. I just knew that I wanted to learn chasing and repousse´ and that now I had the tools. Maybe I thought that I’d learn through osmosis? I still don’t use some of the tools that I received in my set.
After all that blathering, I’ll go ahead and contradict myself: If you have a set, you all ready purchased or if buy a set “by accident” (hmm…?) you can repurpose the tools you can’t find a use for. Sometimes it just takes a slight alteration and the tool goes from duh? to wow!
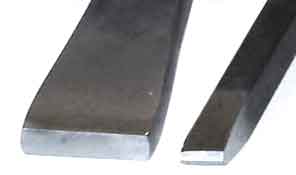 This image shows unfinished tools. Note the sharp edges.
 This tool has a nicely rounded edge.
Image borrowed from this great store on Etsy: 2 Moon Tools.
- Keep in mind the size of the pieces you will be working on when purchasing tools. Some C & R tools are quite large and if you planning on making tiny, quarter sized images – you won’t be happy.
Adapting Purchased Tools
- Using, either sanding discs (see my videos – Part one and Part two – and web page on Sanding for more details on the sanding discs) in a flex shaft, sand paper or a belt sander (link is for the fabulous Wolf Belt Sander), reshape the tool and remove all sharp edges.
- Starting at 180 or 220 grit, will remove the material faster. Watch that you don’t remove too much or change the shape of the tool (unless you want to!). You can sand until you reach 600 grit or you can go up to 1200 grit or so and then, using tripoli, finish to a high polish. Try out matt and high polish tools and see which you like best.
- Keep all tools: files, sandpaper, sanding discs, belts, buffs, etc., seperate from your non-ferrous metal working tools. Don’t mix ferrous (iron based) with non-ferrous (non-iron based). You can accidentally plate your silver with copper (during pickling), you can scratch your material, your sweeps (the flotsam and jetsam from sanding, filing and buffing) will be contaminated, etc.
- Wear a mask and goggles!!!!!
- While rounding the edges, care must be taken that the metal doesn’t get too hot. If the metal has yellow, brown and/or blue colors, the tool is overheated and has lost its temper. At this point, the tool must be re-tempered (see making your own tools). If a tool loses its temper, it can become very brittle and can shatter sending flying steel at your eyes.

Sanding a tool with a sanding disc and flex shaft.
- Keeping the steel cool can be achieved by dipping it in water, as it heats up. It’s recommended, to then dry the tool, protecting your sanding belts or discs from getting soggy. Also, as you are working with electrical tools, there could be a shock hazard. So, sand, quench, dry. Quenching will be especially important if you are using a belt sander or a grinder. If the steel burns your fingers, you need to quench. Also, the steel should be thoroughly dried after you are finished or you’ll have a visit from the RUST FAIRY!

Types of Chasing Tools
 Mark made by a typical liner
- Liners – Liners leave crisp indents in the metal without cutting through it. The are wedge shaped with rounded edges. They are usually the first tool that you will use. They are used to imprint your design in the metal. When you line out your design, the metal will be pushed from the front – creating a raised line on the back side. Liners are also used on the front side for undercutting the design and are also great for creating textures. There are also curved liners for creating curves – both large and small. Some liners are long and straight for creating straight, running lines and other are small enough to create small curves.

Image of a few liners, (again) borrowed from 2MoonTools on Etsty.
- Undercutting Tools aka Setting Punches – These tools are used to fold, push or flatten low parts of your design. They are able to push, from the top, edges in and under your piece creating an illusion of depth. The can also be used to lift up an edge and to create a square wall.
 Some Undercutting tools. These are from Otto Frei and are part of a set.
- Running Punches – The running punch is basically a liner but it is broader and has a more curved edge than the liner. It creates a line similar to the liner but wider and more rounded.

Unfinished running punches
Marks made by running punches.
- Matting Tools – This tool has an all-over pattern that is used to create a subtle texture on your piece – creating a matt finish.

Matting tool (image borrowed from Nechamkin Chasing Tools).
- Stamps – Like the matting tool and the textured chasing tool, these tools have an all-over pattern. The pattern is usually deep. Stamps are used on metal that is on a hard surface, like a steel block or wood to create sharp indentations in the metal. Letter stamps are an example of this type of tool.
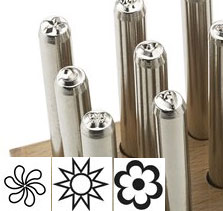 This set of stamps is from Rio Grande,
- Planishing Tools – These tools are generally used to smooth out the marks, left by the chasing and repousse´ process – imparting a smooth, sometimes shiny appearance to your metal. They have either flat or gently curved faces and are often of thicker stock. They usually are highly polished.
- You can sand the tool marks off of your metal but sanding will thin heavily worked metal further. Planishing also work hardens your metal and is usually one of the last steps. Planishing can also be used to create crisp edges to refine your design.
 Planishing tools from Nechamkin: rectangle, teardrop, and triangle planishers.
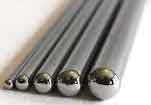
- Repoussage Punches – These tools are generally used on the back of the piece, to punch the metal out. Although, they can be used on the front side too. The tools are rounded and have soft edges. They come or can be made, into a variety of useful shapes – depending on the design requirements. Some shapes are: round, tear drop, square, 1/2 round, etc. Dapping tools are useful repoussage tools but, only a small portion of their surface comes into contact with the metal. A more gently curving face will allow more surface contact. Other materials can be used as repoussage punches such as the plastic based: Delrin or nylon. You can also use wood or bronze.
 Repousse´ punches from Nechamkin: Shallow Oval Embosser, Shallow Rectangular Embosser, Small Shallow Embosser.
What type of C & R tools to start out with:
- You’ll need at least two liners – a med sized one and a small one.
- You’ll want some repousse´ tools, in round and square shapes. Teardrop shapes are useful too. Dapping sets work for repousse´ – although not ideal, I still use them occasionally.
- You’ll also want a curved liner or two for round shapes. Maybe start with a small and a medium sized one. I’d also get a nail set for tiny circles.
- A couple of pushers to sink the metal down.
- A planisher to smooth out the surface.
- Places to buy chasing and repousse´ tools
- 2 Moon Tools – I just purchased some and they are beautiful
- Bill Dawson
- Contenti
- FDJTools – also carries Saign Charlestein Tools
- Metalliferous
- Nechamkin Silver Studios – this is a really nice set to start with
- Otto Frei – also carries Nechamkin Chasing Tools
- Pieh Tool Company
- Rio Grande
- The Mettle Works – they have a two good beginner’s sets. One set has larger tools (approx. $115.00) and one with smaller tools (approx. $110.00).
- Valentin Yotkov
Making your own Chasing Tools
See my page: Making Chasing and Repousse Tools
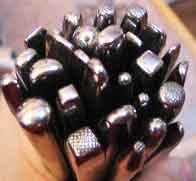 Image borrowed from the Metal Artist Forum
- Steel for chasing tools has between 1/2 to 1 1/2% carbon. That said, the best steel for chasing tools is has 1% carbon. Generally, High Carbon Steel is divided into two classifications: W1 and O1. The “1” stands for 1% carbon. The W1 is a steel that is quenched in water and the O1 is quenched in oil. Both work for chasing tools.
- If you are making your own tools (and you eventually, should) you’ll want steel that is either sold as drill rod (silver steel in England) or tool steel bar stock. When purchasing check whether they are W1 or O1.
Round and Square Stock
- You’ll probably have to cut the rod or bar yourself, so think about that when purchasing the steel. A 20 foot length may be too long to deal with.
- Cut the stock at 4 to 4 1/2″ long (approximately 10 cms). Charles Lewton-Brain discusses the Scandinavian/Northern European method in his CD:
The Lost Books Series: Chasing and Repousse.
See illustration below.
 Step ONE
Suppliers of Tool Steel
Hammers
 Damascus chasing hammer from SC Studios. Handmade and pricey but, WOW, this is a beautiful tool. SC Studios has amazing tools – you should drool on their page. Just keep the drool out of the keyboard! I’m saving up!
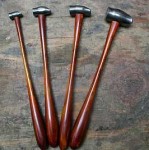
Some notes on chasing hammers
- Chasing hammers have larger faces. This makes it easier to hit the end of your chasing tool. When you are working, you don’t look at the end of the tool, you look at your work so, not having to have precise aim – because of the larger head – makes the process easier.
- Usually, you want your hammer faces beautifully smooth and shiny – because, whatever is on the hammer, is transferred to the metal. But, with a chasing hammer, the face gets all messed up because, you are hitting steel chasing and repousse tools. The hammer is just there as the force to drive the other tool into the metal. Makes me sad to ruin a beautiful hammer face but, that’s the way it is.
- Chasing hammers have very unusual but, perfectly suited handles. The heads, of the hammers, tend to be bulkier than the long, thin handles. Those thin handles flex when the head hits the chasing or repousse tool. Then as it recoils, it whips back on the up stroke. This spring or whipping action reduces the amount of stress that the muscles in your wrist and forearm experience as well as increasing stroke control. You want a handle as thin as you can get it yet, strong enough to survive use. Think: jackhammer. Tap, tap, tap, tap, tap, etc. (say that fast!). The hard steel of the head also adds some springiness to the stroke.
 Beautiful SC Studios chasing hammers. The best chasing hammers are made of fruit woods – apple, pear, cherry – which are less strong but springier than woods like oak or hickory. Hickory has been the traditional wood used. A hard, strong, less flexible wood will make you work harder and your arm/wrist will become fatigued quicker. My next, new tool.
- On hammer faces: some like a curved face while others like a flat face. Whatever you like, you can adjust your hammer to the shape you want it to be. The face can be ground down, flat with a grinder and sandpaper. Those who like a flat face say that there is less tendency for the face to slip off and helps with accuracy when striking the chasing tool.
- Use the peen end of your hammer (if it has one), to texture and shape. You can also use it to make rivets.
- You’ve probably noticed the bulbous gripping part of the hammer. This is designed for long hours of use and to fit comfortably in your hand. The shape also helps you to orientate the direction of the hammer head. If your hammer doesn’t fit well, you can: 1. send it back and try another or 2. add a wad of Jett Sett to the handle and shape to fit.
 Kanazuchi Hammers from SC Studios are gorgeous! The handles are made from Osage orange wood. Japanese chasing hammers are designed differently. The tools employed by Japanese practitioners of the craft, tend to use smaller, lighter chasing and repousse tools. The handles are straighter and the length is determined by the weight of the head by precise calculations. The faces of the hammers, are smaller than western versions.
- Another thing to notice on a chasing hammer is the direction of the wood grain. Saign Charlestein explains it better than I can here, in his video: What to Look for in a Chasing Hammer.
 (They aren’t the same type of hammers. This nylon hammer, was the only one I could find with a round opening.) One more item to be aware of is if the hammer is mounted in the head with an oval or a round opening. A round opening will allow the head to spin.


 You can see the difference between these two – a cheaper one on the left and SC Studios’ Stubby Pattern chasing hammer. The hammer on the left, is probably made a hard, non-flexible wood and has a thick handle. SC Studios’ is made from Osage orange wood and has a nice, slender area. Note the nice grip on the SC Studio hammer.
More Information on Chasing Hammers
Here are some really good videos from SC Studios on what to look for in a hammer. I also really liked the “Thick versus Thin Handles” video.
 (Click image to enlarge) I ADORE my SC Studios chasing hammer. The best chasing hammer I’ve ever used. At slightly under $200.00 US, it’s pricey but, so worth it. It springs back from the chasing tools, creating an easy rhythm and allowing me to pound away a lot longer than with a stiff, unresponsive tool.
After using the SC Studios’ hammer, I don’t use my Fretz chasing hammers anymore. Just not the same…
SC Studios also sells just the grip (handle) now. So, that will save you some cash – changing out the head from another hammer and adding it to the grip might work? Usually though, the heads are designed, in conjunction with, the handles so, the balance could be off but, I don’t know! Somebody try it and let me know! The handles run about 75.00 US and are made from Osage Orange wood.
 (Click for a larger image) (Steve) Lindsay Engraving Tools also has a GORGEOUS hammer. Might need to get one????? Less expensive than some at 78.00 – 89.00 US. Pretty.
 Nechamkin also has a beautifully made hammer but, I haven’t had the pleasure of trying one yet. Also pricey at about 190.00 US.
A few suppliers of chasing hammers
- Also, Otto Frei.
- Here’s a selection of chasing hammers from Rio Grande.
- SC Studios, Metalsmithing-Tools.com. They have breathtakingly beautiful tools: hammers, stakes (coming soon), chasing and repousse tools, custom tools, California red pitch. They also have some really good instructional videos and information: Tutorial Tuesday.
- Nechamkin.
Pitch – please see the “Pitch” page
Books on Chasing and Repousse
Some other books that are either fully about Repoussage or have a section on it are:
- Chasing: Ancient Metalworking Technique with Modern Applications, by Marcia Lewis
- The Complete Book of Jewelry Making, by Charles Codina, pgs. 88 & 89.
- The Ganoksin Project has many out of print books available. You can also purchase Charles Lewton-Brain’s: Lost Books CD: Chasing and Repousse´. These books are on (obviously) a CD. See the link above.
- Jewelry: Fundamentals of Metalsmithing (Jewelry Crafts), by Tim McCreight, pgs. 25 & 26.
- Metalwork and Enamelling, by Herbert Maryon, pgs. 113 – 123.
- Basic Jewelry Making Techniques, by Jinks McGrath, pgs. 68 – 69.
Related Videos
Please see my Chasing and Repousse playlist on YouTube.
Hi Linda, Thanks for writing! The bowling ball thing looks like sooooooooooo much work. I’m too lazy for that. I’ll stick with the pre-made bowls. The mouse pad is not a bad idea. Might work for shallow relief. Let us know if you use the pad. Thanks again and enjoy. Nancy
Hi Rachel, Thank you for the lovely email and a great question. I have never heard of using pebbles. Maybe it is a European thing? I have heard of using plaster of paris or cement in the bottom to save on the pitch. This will not work if you plan on doing vessels – also there are other issues. Take a look at this response from “The Master”, Charles Lewton-Brain: http://www.ganoksin.com/orchid/archive/200511/msg00023.htm. I hope this helps you to make your decision. Personally, I’d fill it entirely with pitch. It is such a wonderful technique and I’m so happy that you were inspired to try it. Thanks again and enjoy the repousse´.
Thanks Charles, Yes, I’m thinking of changing my name to Nancy Busy Hamilton! Talk to you soon, #1. Nancy
Thank you so much Amie! I really appreciate the wonderful comment. Welcome to the world of tools, techniques and therapy! Take care. Nancy
OOPS! Forgot to give a big thank you to Nancy for being so generous with her information.
Here is a link to using a bowling ball as a pitch bowl.
http://www.ganoksin.com/borisat/nenam/jeweler-pitch.htm
From one Linda to the other Linda. I too am looking at everything as a potential pitch bowl. I have a small cast Iron skillet (~5″) that I already messed up melting some bismuth. It isn’t ideal, but I really really want to try. I got a set of chasing and repousse tools in the mail today. (eBay). Now I want to get started. HMMMMM how about the mouse pad for a small trial piece.
Hello Nancy!
I am a big admirer of yours, but have never spoken to you.
You inspired me to want to try repousse. I am in Europe and found some german red pitch at fischer (they call it embossing cement). I inquired with them about how much pitch I should buy to fill one of their bowls. They told me I could go with 1 package because the bottom of the bowl would be filled with pebbles. I haven’t heard anyone else speak about this, do you know anything about that?
Thanks so much if you can help!
Wow, Nanc! You certainly do it up right. Between these pages and your videos, it appears you are sorta busy… We, your ever growing fan base, appreciate it!
Nancy, I just got hooked on silversmithing and also just found your site, keep posting your videos, they are wonderful! Thanks -A
Hi Linda, thank you so much for a very funny email. I needed a laugh today after yesterday’s insanity. We released the Riveted Portrait Pendant video and everything that could go wrong – went wrong. Sorry for the slow reply, I’m always running out of time. Second half will be released Saturday (tomorrow) am. Third part will be released on either Monday or Tuesday of next week. Have a great day and thanks for your lovely comment. Take care. Nancy
Thank you, thank you! I am sitting at my workbench with hammer in one hand and my liner tool in the other eagerly awaiting the next step. Just kidding, but I did order all of the tools of the trade today, except the pitch bowl. There’s got to be something in the basement I could use…..I wonder if my husband would notice a chunk sawed off of his bowling ball?